Most users will submit jobs and interact with IonQ through an SDK like Qiskit, but in some instances direct API submission is preferred. This guide walks you through the basics of using the IonQ Quantum Cloud to write and run quantum programs. You’ll learn how to use the latest v0.4 Quantum Cloud API to define quantum circuits, submit them as jobs, and access the results.
Before you begin
Before you get started, ensure you have an IonQ Quantum Cloud account and have created an API key. For guidance on setting up and managing your API keys, please refer to our dedicated guide.
This guide assumes you have completed these steps and stored your API key as a local environment variable named IONQ_API_KEY.
Writing a quantum circuit
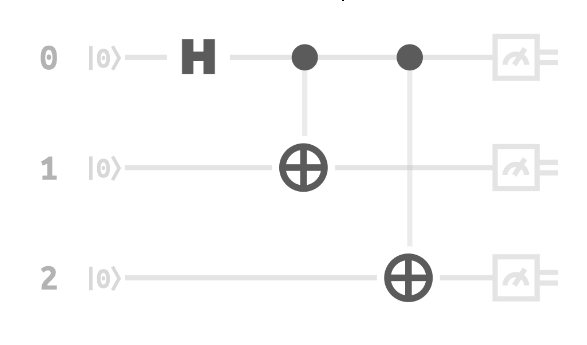
We’ll need to create a quantum circuit to submit as your first job. Let’s use a simple GHZ state using three qubits, first applying a Hadamard gate to a single qubit, and then using it as the control qubit for a series of controlled-NOT gates on the other two.
A three-qubit GHZ circuit can be visualized like this:
 In IonQ’s language-agnostic JSON circuit representation, the circuit looks like this:
Submitting a quantum circuit as a job
For the purposes of this guide we’ll use
curl on the command line, but in the real world example, you’d likely want to use an
SDK.
simulator or qpu.forte-1). We can also assign a name to the job for easier reference.
For a full list of options that can be passed to this resource, check out the API reference for POST /jobs. ghz-job.json.
We’re now ready to submit our job to the IonQ Quantum Cloud API. We’ll use a POST request to send our JSON job data to the job creation endpoint. This request will include two headers: one for authorization using the API key we created earlier, and another to specify that the request body is in JSON format. In this example, we give the backend key the value simulator, which sends the job to our QPU simulator:
This will return a response similar to the following:
The returned id can then be used to manage the submitted job, including canceling it and checking its status.
Retrieving a job status
To retrieve the status of a job, we can use a GET request to its unique resource URL, identified by the job ID:
Remember to replace {your-job-id} with the ID you just got back.
GET request will resemble the following:
Retrieving job results
With the job completed, we can retrieve the results using the probabilities endpoint:
This will return a dictionary containing the job results:
The results request provides a histogram representing the probabilities of each measured state across all 1024 shots. It’s important to note that this histogram is sparse, meaning it only includes data for outcomes that were actually measured.
For example, if you ran 1024 shots of a 3-qubit circuit, there are 8 possible outcomes (000, 001, 010, 011, 100, 101, 110, 111). However, if only states 000, 011, and 111 were measured, the histogram would only contain entries for those states, omitting the others.
Additionally, the output keys are formatted as big-endian integers, where the leftmost bit corresponds to the qubit with index zero from the submitted program. For example, 0 represents 000, 2 represents 010, 3 represents 011, and so on.
API v0.4 also provides a dedicated endpoint to retrieve detailed billing information for a job:
This will return cost details including estimated and actual costs in USD.
Additional Resources
If you’re working on your own tools to interact with the API, the full API Reference has details on HTTP verbs and endpoints, expected response formats, and other features not covered in this guide.
Additionally, our best practices page provides detailed instructions for getting the most out of our trapped-ion systems, and our QPU submission checklist is great to run through before submitting a job to one of our QPUs.