What is Qiskit?
Qiskit is an open-source Python SDK for working with quantum computers at a variety of levels—from the “metal” itself, to pulses, gates, circuits and higher-order application areas like quantum machine learning and quantum chemistry. It has “Providers” that enable support for different vendors and the various “backends” (read: quantum computers or simulators) that they offer. IonQ maintains an IonQ Provider for Qiskit that allows you to work with our trapped-ion systems and our high-performance cloud simulator, which we’ll install and use here.Before you begin
You’ll need an account on the IonQ Quantum Cloud, and you’ll need to create an API key. We also have a guide about setting up and managing your API keys if you need some help. You’ll also need Python 3.11 running locally on your machine.Set up Qiskit
First, we’ll install Qiskit and the IonQ Provider from PyPI using pip:Note: We encourage doing this inside an environment management system like
virtualenv or
conda so as to avoid this
fate, but do what makes the most sense for you.
Package versions and compatibility
You can install specific versions ofqiskit and/or qiskit-ionq via:
qiskit-ionq requires Qiskit, installing qiskit-ionq alone in an environment without Qiskit will automatically install the latest Qiskit version that’s compatible with your qiskit-ionq version.
Additionally, installing Qiskit first and then installing an unspecified version of qiskit-ionq should automatically select the latest version of qiskit-ionq that’s compatible with your version of Qiskit.
These are some of the most notable differences in support and compatibility for different package versions of Qiskit and the IonQ Provider for Qiskit. For more information, refer to the qiskit-ionq release notes on GitHub or reach out to [email protected].
Qiskit 2.0 support:
The IonQ Provider (qiskit-ionq package) versions 1.0 and above are compatible with Qiskit v2.0. If you’re using Qiskit 1.x or 0.x, you may need to install an older version of the IonQ Provider. If you’re using Qiskit 2.x, you will need a more recent version of the IonQ Provider.
IonQ API versions:
The IonQ Provider versions 0.6 and above use the IonQ Quantum Cloud API v0.4, while prior versions use our API v0.3. For the most part, the IonQ Provider should handle the API changes automatically and support the same functionality across both API versions, but there may be differences in behavior or functionality in some cases.
Qiskit default transpilation settings:
Qiskit versions 1.3 and above also use a default optimization level of 2 for the Qiskit transpiler. If you’re using Qiskit’s transpile() function with these versions of Qiskit (specifically to convert to IonQ’s supported QIS gates before submission), we recommend passing optimization_level=1 or optimization_level=0 to avoid transpilation passes that can result in a net reduction in efficiency when combined with IonQ’s compiler. You may see an IonQTranspileLevelWarning when using the IonQ Provider with these Qiskit versions, but no action is needed unless you are using Qiskit’s transpiler to convert to IonQ’s accepted QIS gateset.
You may also set the default optimization level for your local installation in Qiskit’s user configuration file. By default, this file is located at ~/.qiskit/settings.conf (if it does not already exist, you can also create a file named settings.conf at this location). To specify or change the default optimization level used for Qiskit transpilation, the file should contain at least:
qiskit.transpile() unless a different value is specified, as in qiskit.transpile(circuit, optimization_level=3). Circuits submitted to IonQ backends will still be optimized for IonQ systems when they pass through IonQ’s compiler. Specifying this setting in your local user configuration file will also suppress the IonQTranspileLevelWarning from the IonQ Provider.
Set up your environment
By default, Qiskit will look in your local environment for a variable namedIONQ_API_KEY, so if you’ve already followed our guide on setting up and managing your API keys, Qiskit will automatically find it.
Alternatively, you can set an environment variable temporarily from your command line, by running:
IONQ_API_KEY, or if you are working from a Python environment where accessing environment variables is not straightforward. You can import your key explicitly or load it from a file, and pass it into the IonQProvider() object directly:
IonQProvider() initialized with no arguments and assume that Qiskit will automatically find your API key, but you can always use this approach instead.
Start a script
For this exercise, we’ll create a Python file and run it as a script. If you’re comfortable and familiar with Python, you can approach this any number of ways—our getting-started repository includes Jupyter notebooks that can be downloaded or run in Google Colab. Open a file up in whatever IDE you prefer, and add the following:Submit a circuit to the simulator
Running a simple Bell state circuit
First, let’s try running a simple Bell state circuit on the ideal quantum simulator. Try running this script:While the ideal simulator creates a quantum state with a 50-50 probability of being measured as “00” or “11”, the
.get_counts() method samples from this probability distribution, so we didn’t end up with exactly 5,000 counts for each state. You can use job.get_probabilities() to see the calculated probabilities for a circuit that was run on the simulator.Submitting multiple circuits in a single job
To submit multiple circuits in a single job submission, pass all of the circuits to therun() function in a list instead:
Submit a circuit to the noisy simulator
To run the circuit (or circuits) using the simulator with a noise model, set the backendnoise_model option like: noise_model="forte-1". The available noise models are aria-1 (legacy), aria-2 (legacy), forte-1, and forte-enterprise-1. You can read more about these noise models here.
Submit a circuit to a QPU
To run the same circuit on IonQ’s quantum hardware (QPU), we need to define a different backend at the beginning of the script and submit the circuit to that backend. Available QPU backend options may includeionq_qpu.forte-1 or ionq_qpu.forte-enterprise-1. You can view which of these systems you can access in the /v0.4/backends resource in the API and on the “Backends” tab of the IonQ Cloud Console.
Viewing job status and results
On the “My Jobs” tab in the IonQ Quantum Cloud application, you can always view the status of all of your jobs, and you can view and download their results.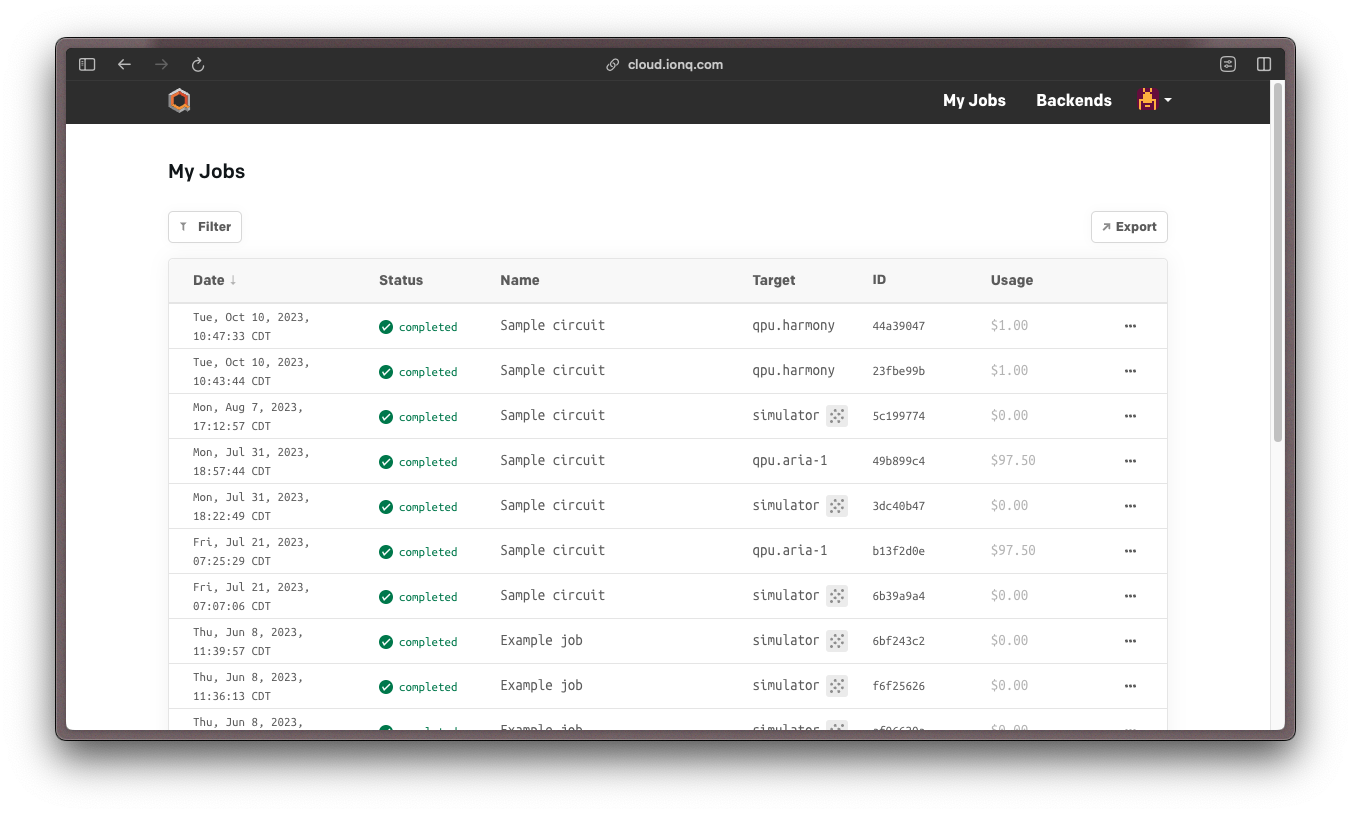
Troubleshooting
If you encounter anIonQCredentialsError, it’s likely that your IonQProvider did not find anything to use as an API key. You can run provider.credentials to print the API key (token) associated with an IonQProvider object; if the returned token is missing, this indicates that the provider did not successfully find your key. You will need to either set up an environment variable named IONQ_API_KEY or pass the key directly into the provider as shown above.
If you encounter an IonQAPIError mentioning “Insufficient scope” in the error message, it’s likely that your IonQProvider found something to use as a credential, but it’s not a valid API key. You may need to generate a new API key, or change your environment variable or code setup to ensure that the provider finds a valid key.
If you encounter an IonQAPIError with a message starting with “Unable to run jobs on IonQ QPU”, your organization or project does not have permissions for this QPU backend. If you see a backend that is not listed as “Out of Plan” at cloud.ionq.com/backends, your organization owner has the option to enable that backend for your project in the IonQ Cloud Console. For backends that are listed as “Out of Plan”, your organization owner may request access from the IonQ team at [email protected].
If you encounter an IonQAPIError with message “Not found” and error code 404 when retrieving a job, you may have tried to access a job that does not exist, or a job in a project that is not accessible to the API key being used. Check the input job ID, and confirm that the backend was set up using an IonQProvider whose API key is linked to the project where the job was run.
Please direct additional questions, support requests, and bug reports to [email protected] or the IonQ Community Slack!